August 2025
Reverse Engineering & Vulnerability Research on Amazon's Blink Video Doorbell
Summary
Versions 12.81 and earlier of the Blink Video doorbell are vulnerable to a buffer overflow in the http server available during device setup. This could allow an attacker on any device within range of the Blink's WAN to gain arbitrary code execution and persistance through an unrelated trusted boot bypass. There is a highly limited vulnerable window (just during initial setup). Version 12.82, released July 22nd 2025, patches the buffer overflow. My analysis suggests the trusted boot bypass remains active in version 12.82, though I have not confirmed this. A proof of concept for version 12.81 is available on my Github. I'm calling the exploit chain "orbital fracture" for no particular reason.
The Start of the Story
Last November, I was in need of a project. I picked up a Blink video doorbell since it was a cheap and mildly interesting IoT device. I figured could entertain myself for a bit by tearing it apart to see how it worked.

I ended up finding a neat decryption buffer overflow during system initialization & managed to pivot that to full persistent arbitrary code execution with a trusted boot bypass. That was good for $7000 and a severity rating of 'high' when I reported it via HackerOne. Getting to that point was a bit of a pain though; it turns out the Blink runs on a niche and mostly proprietary ISA (ARCompact) and has more reasonable security than a lot of other devices I've worked with.
First Steps
To get my bearings, I ran through the official setup process on my phone, snooping on the network with PCAPdroid and bluetooth recording enabled (Android just supports that, you don't even need root!). The blink throws out a wifi network with an ssid based on its serial number; the Blink app connects to that network, does some configuration (over http, but most of the data is encrypted), and then you’re good to go. After that point, it seems like Blink relies on a connection to your wifi network for everything, communicating via Amazon’s servers.
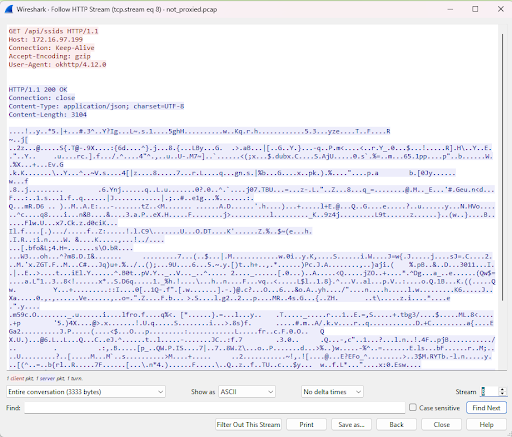
A request to the Blink's http server
Next step: Tear Down
At this point ideally I'll find a microcontroller and some flash memory, dump the flash to find what code the device is running, and start reverse engineering. I found 3 promising looking chips:
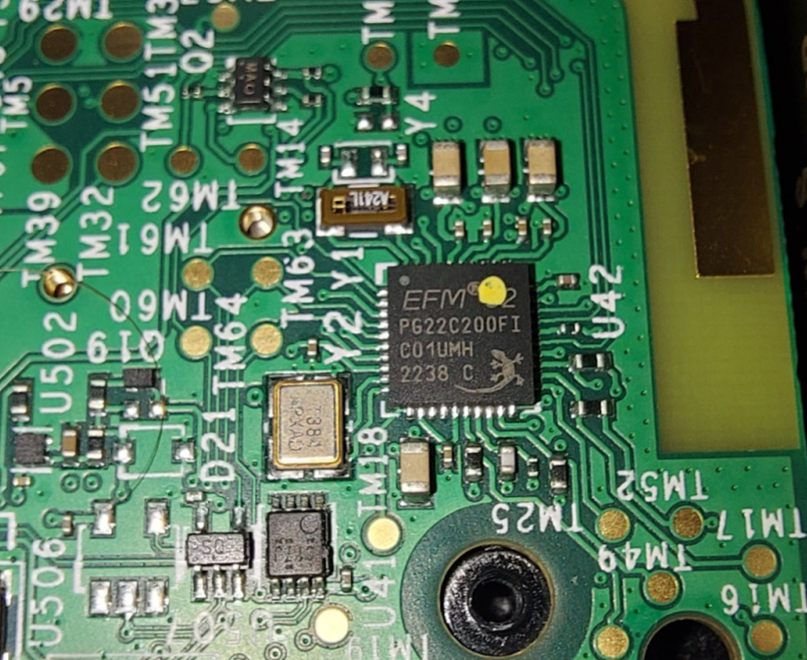
Arm core
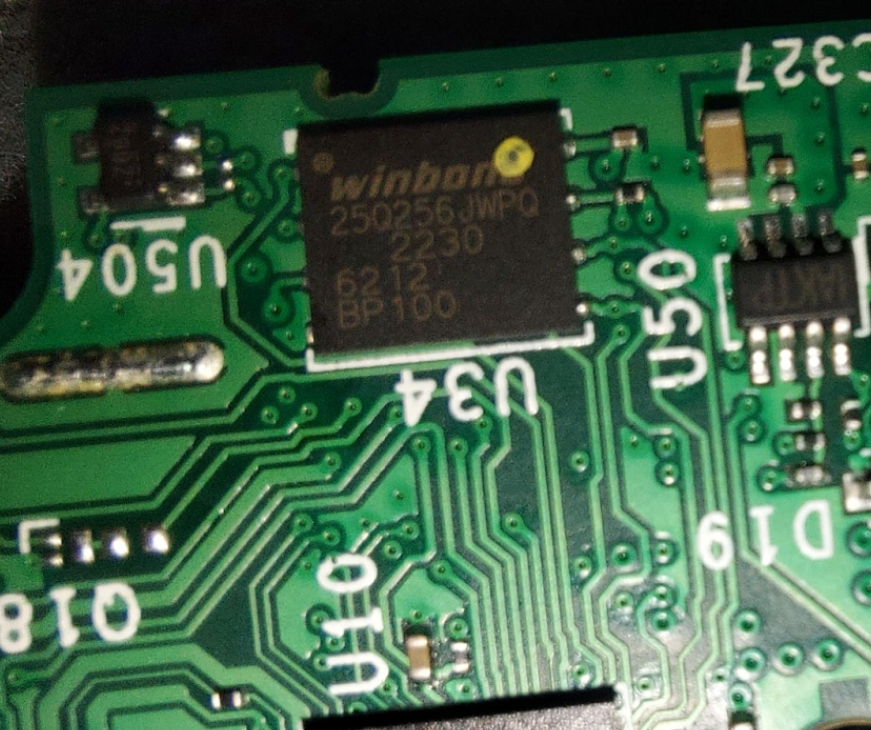
Flash memory
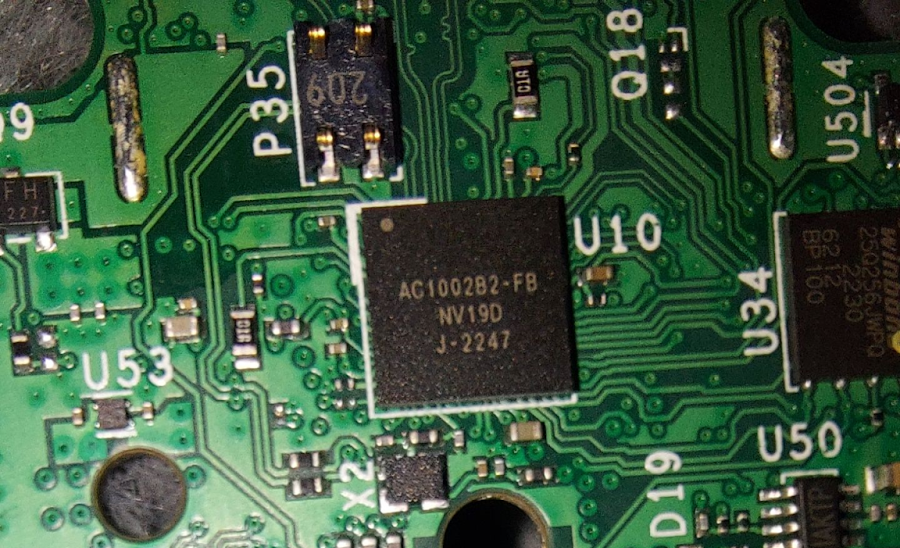
Unknown chip
I get my wish, mostly. The first chip is pretty easily identifiable as this Arm Cortex mcu, and the second is this SPI flash. The third chip is centrally located, reasonably sized, and looks like it should be a microcontroller. Unfortunately, the only references to AC1002B2-FB I can find online are related to the Blink. In the process, I found a few blog posts on astrid.tech and one at brainonfire.net that talk about disassembling similar devices. Astrid managed to dump the flash; Let's follow those footsteps.
I didn't really want to pull the spi flash off the board though. With the help of my friend Andre I was able to identify some pads that are electrically connected to the relevant pins of the flash chip; we soldered jumpers to them and tried to read the chip.

I'm really good at soldering, I promise; those burn marks are on purpose
We ran into a problem immediately; the flash chip runs on 1.8v, and the FT232h I had only worked on 3.3 or 5 volts. Using some arcane trickery only known to CE majors, Andre attempted to homebrew a level shifter.
What is this? Why is there a variable resistor? Don't ask me
It was a valiant attempt, but worked about as well as could be expected. I ordered a level shifter off Amazon and waited a few days. The version of flashrom distributed by Ubuntu didn't have support for the W25Q256JW, but after a quick build from source we were in business.
The business in question
I ran the command a second time and verified it produced the same file both times (long wires and noise in the system can lead to bitflips if the clock rate is too high for the signal to settle between pulses; the flashrom option divisor=8 clocks the devices at an eighth of the normal speed to compensate). Now all we have to do is parse the contents.
Decompilation
Binwalking the dump only found a couple x.509 certificates, but it seemed pretty structured; time to reverse engineer the format. The first thing to do is check out the dump on binvis.io.

Entropy of the dump, visualized with binvis.io
The dark regions are low entropy repeated 0xff's, the purple regions are code or strings, and the bright pink is encrypted or compressed data. Since files are generally separated by empty regions, this visualization makes it really easy to pick out where they start and end. I grabbed a couple file start offsets, searched the binary for them to try and find a struct describing the layout, and got lucky enough to pretty quickly find one.
First few bytes of flash with file structure highlighted.
Each firmware BUND(le) contains 0x24 bytes of header information, then repeated 0x10 byte blocks describing files. Each block has an ID (yellow), version (green), offset (blue), and length (pink). All information is stored in big endian, which suggests the main processor is also big endian. I wrote a quick python script to parse out individual files.
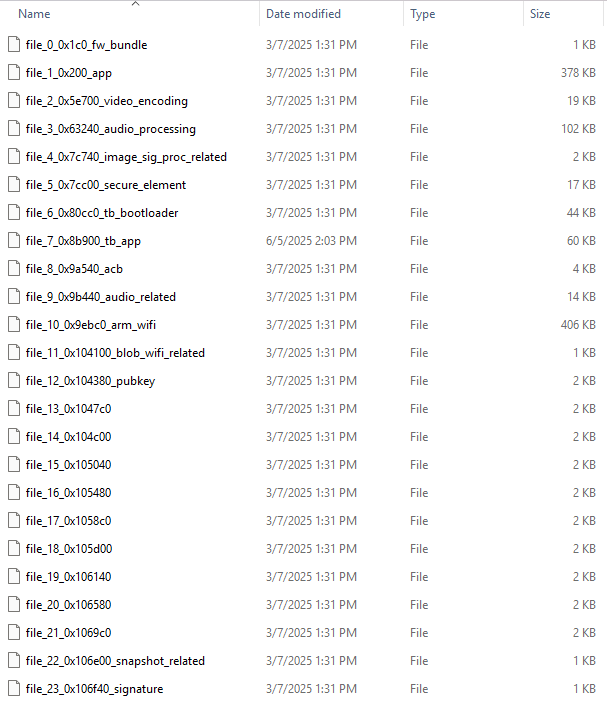
Files, since labelled.
Having parsed the firmware files, one file immediately stuck out; it had nearly every string, and had to be the app. I turned my attention to it, and initial progress wasn’t great. Trying to decompile the app with any ISA available on Ghidra yielded mostly nonsense. I could tell the segment was code, and not encrypted; Ghidra has a neat feature kind of like binvis where it’ll give you an overview of the entropy of the file in the sidebar. Arm, x86, and ascii all have distinct entropy profiles based on how densely encoded information is, so Ghidra can normally automatically label segments.

Attempting to decompile the app in ARM big endian; that’s clearly not a real function
The blue segment at the bottom of the bar is mostly ascii strings; everything above that is code. After doing some more looking around, I found the following string:
Copyright (c) 1996-2018 Express Logic Inc. * NetX Duo ARC600/MetaWare Version G5.11.5.0 SN: Amaxon_Eval_10-18-18 *
ARC600 is a processor family produced by Synopsis; they’re all ARCompact based, a compressed instruction set. The AC1002B2-FB proprietary chip must be ARC based and running the main app. Unfortunately, Ghidra doesn’t support ARCompact. I had no luck trying to find a decent decompiler, or even a working disassembler for big endian ARCompact. I did find a fork of Ghidra by Nicolas Iooss that claimed to work on little endian systems, and figured making that modification wouldn’t be too bad. Generally just changing a few lines in the language definition should do the trick, but in this case it didn’t because ARCompact in little endian mode actually operates in middle endian.
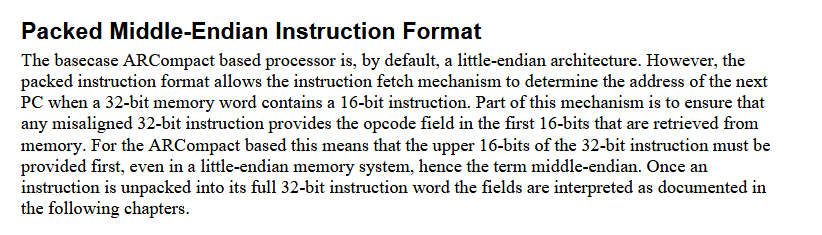
Page 32 of the ARCompact programmer’s reference
I went in, changed a few lines of the slaspec (Ghidra’s way of defining an instruction set), and I had a working big endian ARCompact decompiler.
The Fun Part (Software RE)
I find working my way through a massive codebase in Ghidra to be a great time. You can pick apart one segment at a time, gradually building up an understanding of how all the pieces work together. It’s a lot like playing a puzzle game; it’s crazy people will pay me to do it. It doesn’t exactly make for gripping reading though, so I’ll just lay out a couple tricks I picked up.
You can tell Ghidra to assume the value of a register at certain memory addresses; this is really handy when working with global pointer (gp) registers.
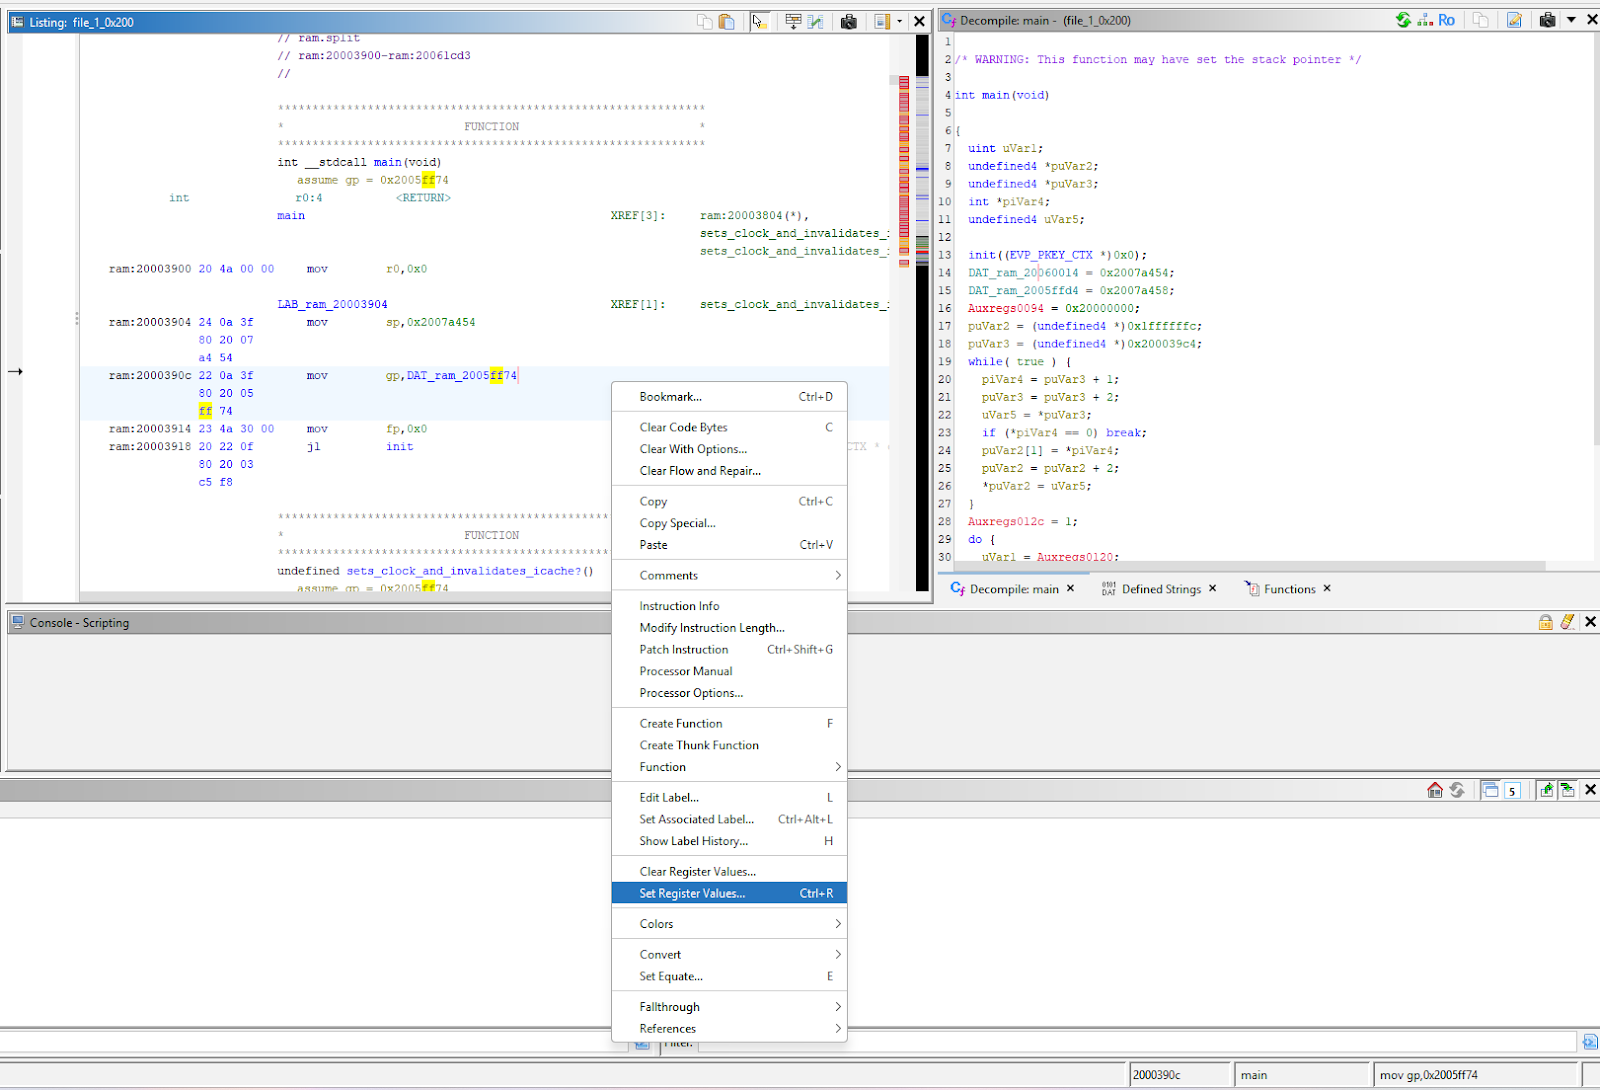
App setting gp on initialization
Gp is initialized to point at the start of global data and never modified; this lets future instructions use it as a base address when referencing addresses in that region, reducing code size. If you use the “Set Register Value” option, Ghidra will be able to resolve those references, making for a much cleaner decompilation.
Marking functions as “not returning” when appropriate can clean up decompilation significantly, and all you have to do is check a box while editing the function signature.
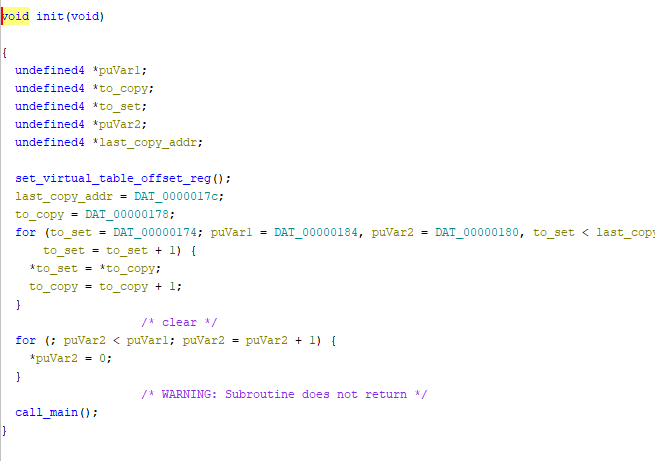
Call_main marked as not returning (left) and returning (right).
AI can be helpful too:

Claude’s output
I found some success just copy-pasting the contents of the decompilation window into Claude. Certainly it was wrong a fair amount of the time, but it also would occasionally pick up on identifying patterns and constants I wasn’t aware of.
After many hours of work, I had:
- Discovered that the Blink runs on the RTOS ThreadX
- Identified plenty of interesting debug print statements
- Reverse engineered my way through the entire networking stack (Don't do this if you're looking for efficiency. Just find the open source library (Netxduo in this case), nobody writes their own network stack. Great way to learn tcp, ip, udp, dns, and dhcp though)
- And found the HTTP server handling initialization
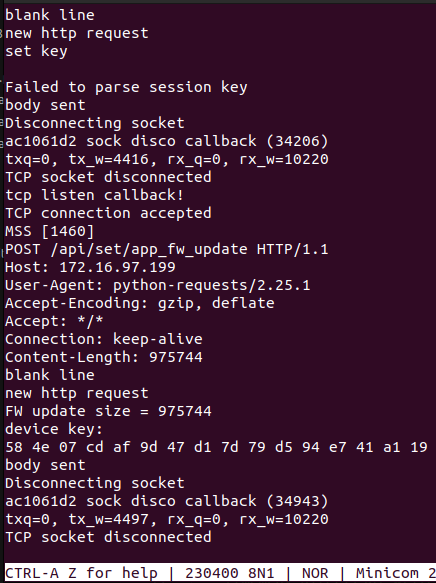
Up to this point, I hadn’t been able to identify serial output on the board, but I saw an opportunity: every invalid request to the HTTP server would generate a few error messages. I factory reset the Blink to get it to launch its Wi-Fi network, then connected my laptop and hammered the server with repeated messages. I then probed pads on the board with a multimeter until I found one with its voltage jumping all over the place (an oscilloscope would be the preferred way to do this, but I didn’t own one at the time).
Debug logs!
It’s the pin labeled TM 58 at baud rate 230400, if you’re doing some OSINT of your own. The Blink has a ton of debug prints, so finding serial output was a big help in reverse engineering. At this point, I wanted to investigate that HTTP server a bit more, so I decided to take a look at the app for some context.
The Blink App
I grabbed the APK off my phone, then ran it through apktool and loaded it into JADX. The app was sending some kind of request off to the server, then got back some data to establish a shared secret with the device.
JADX decompilation of send key
I wanted to see what that server request looked like, but it was over HTTPS. Apps built targeting Android 7 and later don’t trust user-installed certificates, so I couldn’t just use the same MITM proxy I had used to grab the HTTP requests to the Blink. I ended up patching the network security config and rebuilding the app; apktool supports this, you just have to resign the app with your own private key (I used buildapp for this, but I've since discovered APKLab, which is awesome).

Network security config, patched to trust user certificates
I also patched the manifest to run the app in debug mode, allowing me to run as its user in ADB and gain access to its private files. This wasn’t useful, but being able to MITM the app was.
MITM proxy capturing app traffic
As you can see, the app sends a request to the server for a session key, giving the server the serial number of the Blink. My assumption is that there’s a key derivation function on the other end that’ll spit out the device key baked into the Blink’s firmware, and that this is used to encrypt the session key. The app never gets access to the device key, just a plaintext/ciphertext pair that it can communicate to the Blink and establish a shared session key. With this proxy, I know that secret and can start decrypting the traffic.
Buffer Overflow
Before I got around to decrypting the traffic, I got distracted. Here’s the function that handles setting that shared secret on the Blink:
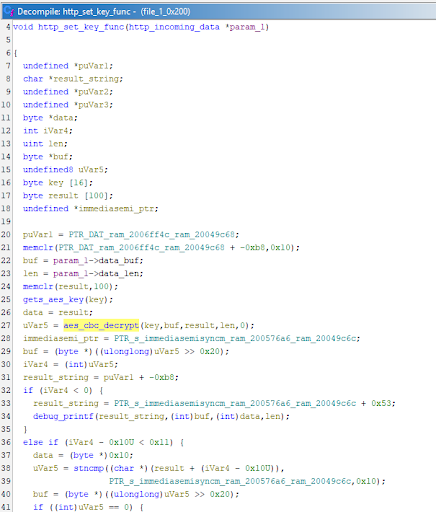
The vulnerable function
Note the 0 in the call to aes_cbc_decrypt; that’s where the length of the output buffer should be, and a 0 means ‘just assume it’s the same as the input.’ Since the output buffer is on the stack, we have a classic stack overflow. The overflowed bytes are the result of an AES decryption with the device key, which we don’t know. Or do we?
After some more reverse engineering, I found that the key was loaded directly from flash, from a segment I could edit (most of the flash is verified by trusted boot, preventing me from just running arbitrary code). That segment was encrypted and verified by another key loaded straight from trusted boot, preventing me from setting the device key directly. I was in luck though; there was legacy code! If an attempt to parse the region with the AES key I was interested in failed, the Blink would fall back to 3 different potential structures, and one of those wasn’t encrypted or authenticated.
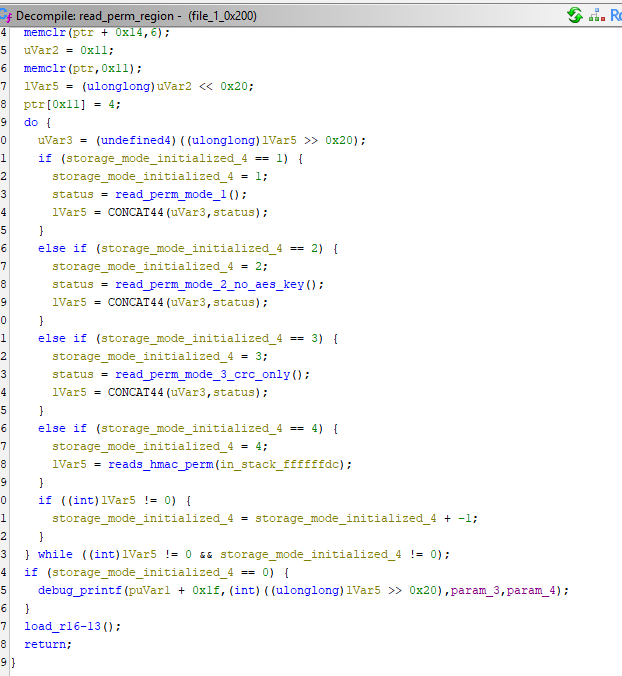
Fallbacks are really helpful
Mode 3 contained all the data I needed to control and was only validated with a CRC checksum. I was able to reverse engineer the expected structure, overwrite the device key with all 1s, and control the stack overflow to start gaining execution.
I found a simple chain to leak the stack pointer (since you control return addresses, jump to something that runs mov r1, sp & returns, then jump to code that pops r0 and set it to point to a string containing a %08x, then jump to printf). Knowing the location of the stack, I figured I would be able to include some shellcode in the submission and jump to it. Doing so just crashed the device though. After some experimentation and review of the ARCompact programmer’s reference, I found out that:
- Regions that shouldn’t contain code are don't appear to be executable, but code-containing regions are writable??
- While data and instructions are backed by the same memory, there is a separate dcache and icache.
- The standard store word instruction just writes to the data cache, but there is a separate store word instruction that causes an immediate writeback.
Since the chip is proprietary, I did this entire project without a reference sheet for the processor. Because of that, I’m not totally sure why data regions weren’t executable (Side note: I tried flushing the dcache to see if that was it. It didn’t work, but identifying the right registers to write to was a pain without a reference sheet and I could have gotten that wrong).
Anyways, after figuring all of that out the plan was pretty simple. I would build a ROP chain to call a variant of memcpy that used writeback stores, set the destination to an executable region I knew would be a miss in the icache, and then jump there. I needed some gadgets to start ROP chaining, so I went to download ropper only to find out that it doesn’t support ARCompact. Neither does any other project I could find, so I got to search the binary for them myself.
# A ghidra script to grab some usable addresses for ROP chaining
def getAt(addr):
    disass = ghidra.program.disassemble.Disassembler.getDisassembler(currentProgram,ghidra.util.task.DummyCancellableTaskMonitor(),None)
    aset = ghidra.program.model.address.AddressSet(addr)
    clearListing(addr)
    disass.disassemble(addr, aset)
    return getInstructionAt(addr)

def nearby(addr):
    res = ""
    for j in range(2, 10, 2):
        v = getAt(toAddr(addr-j))
        if v is None:
            res += "| noop "
            continue
        res += "| " + str(v) + ", " + str(v.length) + " "
    return res

def run():
    f = open("C:\\MyStuff\\reverse_engineering\\blink\\rop.txt", "w")
    for i in range(0x20003800, 0x20052ef4, 2):
        v = getAt(toAddr(i))
        if(str(v) == "pop_s blink"):
            if(str(getAt(toAddr(i + v.length))) == "j_s blink"):
                f.write(hex(i) + ": " + nearby(i) + "\n")
    f.close()

run()
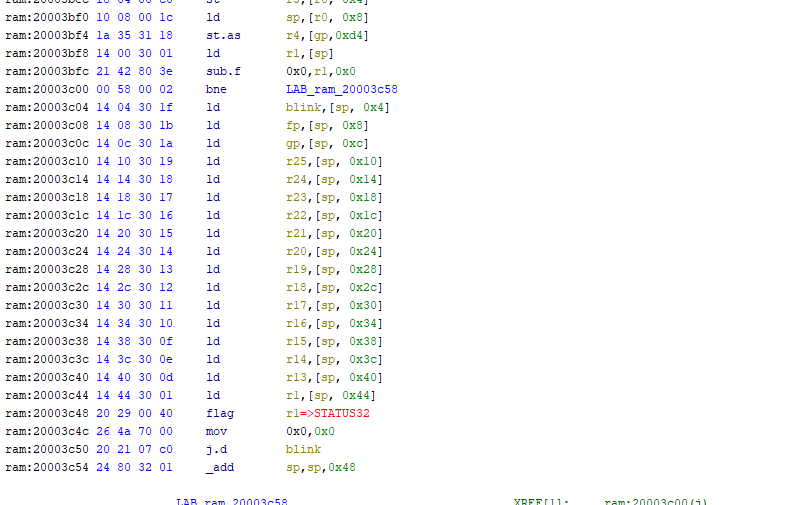
This script is made less useful by the fact that, to save space, the compiler consolidates function epilogues to one location that it branches to at the end of each function that uses caller-saved registers.

A call to ‘load_r13-20_and_return’ or similar ends every function that uses caller-saved registers.
I could expand my search to include these, but it finds 300 or so gadgets as is, which ended up being enough to complete the memcpy and start running shellcode. The size of the buffer limited me to about 0x60 bytes though, and really I’d like to be running arbitrary C. You could accomplish that in any number of ways, but I chose to patch the firmware update API, as it already had the functionality implemented to download a lot of data. After the patch, posting data to /api/set/app_fw_update on that initialization Wi-Fi network will result in the Blink running it at address 0x20001000.
All I had to do to get C running was grab a cross-compiler, set a few options to prevent the compiler from reordering my binary, and give the linker the right base address. Then I could use functions already existing in the binary by just defining them as an address in a header file.
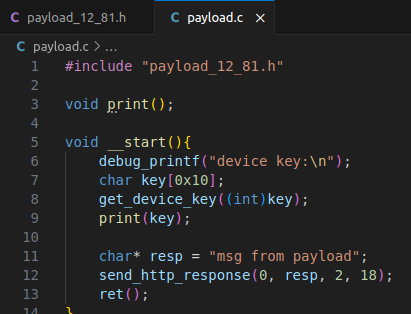
C code to run
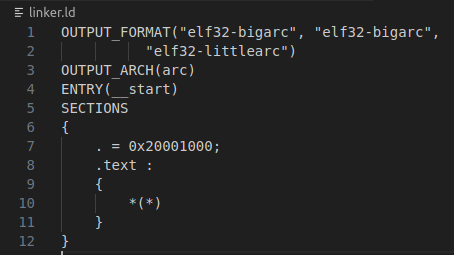
Simple linker script, telling it to start at address 0x20001000

Makefile
With everything set up, I just connect to the network, type make send, and payload.c is compiled, the exploit runs, and the payload starts running.
I used this new functionality to leak the bootloader key (In the photos above, the payload leaks the device key, not the bootloader key. If I had run that code using the exploit described above it would have printed the device key as 11 11 …, but I found a way to not need to overwrite the device key). I then told Andre about the attack and he had a neat idea.
It Was Something Dumb
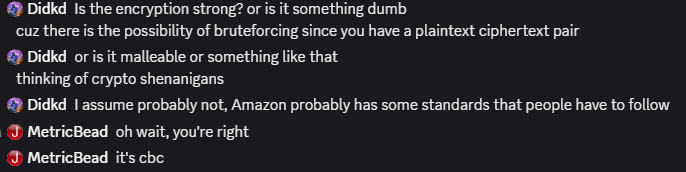
Who needs standards
The Blink uses unauthenticated AES CBC for a significant portion of its encryption, which is vulnerable to malleability attacks. Given a known ciphertext/plaintext pair, an attacker without knowledge of the key can generate a ciphertext block that decrypts to an arbitrary value. This Stack Exchange post explains it reasonably well. The layout of the set key message is one block (0x10 bytes) of IV, one block of the shared secret, and one block of the constant string “immediasemisyncm”. Since the last block is a constant, we have a plaintext/ciphertext pair. In fact, since this message is transmitted on an unsecured Wi-Fi network over HTTP, anyone within range of the Blink’s Wi-Fi network can eavesdrop on initialization to such a pair. (Note that an attacker could also just send a request to the Blink servers and get a pair by emulating the app. This would have required more RE work and is less cool.)
I flashed the Blink back to its original device key and set up a Python script that drops my laptop’s network card into monitor mode using airmon-ng, then listens on the appropriate channel. I used tshark to grab the first POST message sent to the Blink’s IP and pulled the data from that message.
Due to the stack layout, I was only able to get one block of usable ROP data. That wouldn’t be enough to get anything useful done, so I looked and found a way to pivot the stack and gain some more breathing room.
A stack pivot gadget
All I needed to do was control r0 and jump to this address. I could set the stack to the start of the message buffer; in particular, I could use the buffer containing the message before decryption. The pivot didn’t make things too easy – popping off 0x48 bytes from the buffer only gave me 0x28 left to work with before running into the overflow – but with some code golf, I was able to make it work (It wouldn’t have been a problem at all if I had a ton of gadgets to choose from, but I still only had the 300. The only register I could even easily load to was r0).
This exploit allows arbitrary code execution from anywhere within range of the Blink’s Wi-Fi network, so long as someone happens to be setting it up at the time. The constraints make this more useful as a jailbreak than an actual attack, unless it’s a really sophisticated attacker. If you’re worried about nation-states, you probably shouldn’t be buying IoT devices anyway. Notably though, the conditions generally preclude a patch from being useful; by the time the Blink is online to get its updated firmware, it’s no longer in danger of being exploited.
Validating the Bug
By the time I had gotten the exploit working, the firmware I was working with was way out of date. I doubted it would get patched, but it’s generally good practice to check. Unfortunately, whenever I tried to connect the Blink to the app to get it to update, the Blink froze. A few print statement insertions later, I narrowed down the fault to the SPI flash write routine.
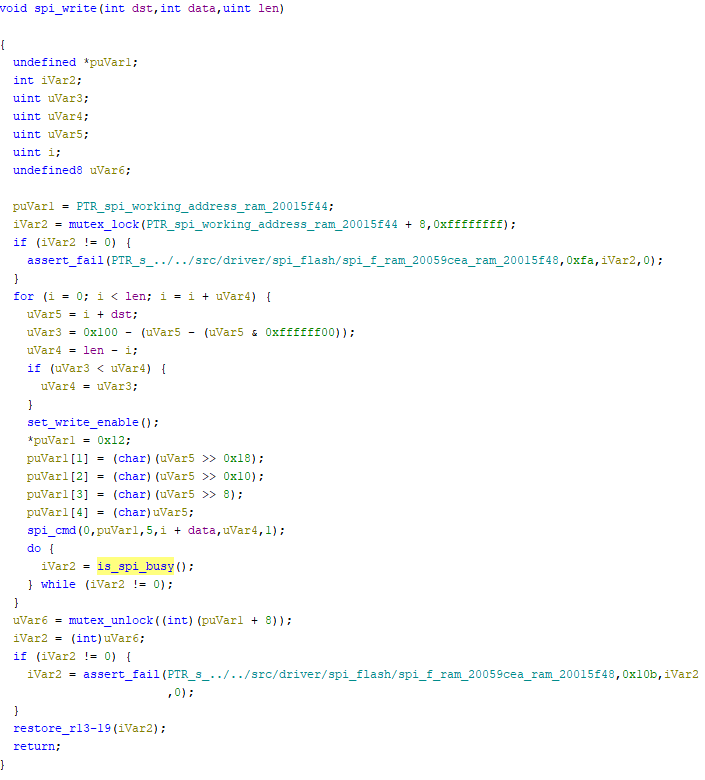
Function to write to SPI flash at address dst
The problem: is_spi_busy would never return 0. Patching that function to just sleep for a quarter second then return 0 caused the write to succeed, but that patch vanished after a reboot, and I couldn’t persist it because of trusted boot. I was able to talk to the SPI flash via flashrom just fine. After running flashrom in verbose mode, the issue was obvious.

Flashrom reads the status register
Description of status register from SPI flash data sheet
Only bit 0 of the status register describes whether or not the flash is busy, but the Blink waits until the entire status register is 0 (is_spi_busy just reads the status register). Somehow bit 6 had gotten flipped to a 1, meaning the Blink thought the flash chip never finished its write. Flashrom, having properly masked the status register, never had a problem. In theory, this should be an easy fix; all I have to do is use flashrom to flip that bit back, and the bug in the Blink’s code no longer matters.
Unfortunately, flashrom does not support write-protect for that model of SPI flash. At this point, I could patch flashrom to fix the bit flip. Or I could try and break the Blink’s trusted boot system to patch the firmware and fix the bug.
Breaking Trusted Boot
Escaping trusted boot seemed like the more fun of the two options. Very early on in the reverse engineering process, I had tried editing the app stored in flash; this caused an error to be printed in the bootloader and the device to freeze. I spent a few days reverse engineering the boot process and got a reasonably good idea of how it worked.
The flash dump contained a few kilobytes of ARM code that threw me off for a while when doing the initial analysis of the binary. It turns out that the PG22C200FI (remember that photo earlier?) is used entirely for trusted boot. My current best analysis of boot procedure goes as follows:
- The ARM bootloader is loaded (There’s also an encrypted secure enclave segment in the flash dump. Presumably that goes before this, but I haven’t explored that).
- The ARM bootloader loads the ARM app from internal flash.
- The ARM bootloader selects the appropriate ARC bootloader, either from memory in the ARM bootloader segment or the ARM app segment if there has been an update.
- The ARM bootloader transmits the ARC bootloader to the ARC chip.
- The ARM bootloader transmits initialization data to the ARC chip.
- The ARC chip starts running the ARC bootloader and the ARM chip transitions to the ARM app. They communicate via I2C.
- The ARC bootloader loads the ARC app via SPI flash and verifies it matches either the hard-coded hash of the matching ARC app (it appears that every app update must include a bootloader update to facilitate this), or the hash of the factory reset app.
- The Blink boots successfully.
The additional data loaded into the ARC bootloader by the ARM bootloader includes a hash of the factory reset app. This is used to restore the Blink if an update fails somehow; the factory reset bundle is never actually deleted from the flash, and if the updated app is corrupted it is loaded as a backup. In a fairly egregious breach of security, there are no protections on the hash of the factory reset app; it can just be updated with no authentication.

Save factory reset app hash when updating from a factory bundle to an over-the-air firmware bundle
As can be seen above, the code that does so even has a nice debug print to make it easy to identify what exactly is going on. (The instruction bl.d means: branch & link but first execute the following instruction, presumably for pipelining reasons). With the capability to change the factory reset hash at will, we can just invalidate the updated firmware, write whatever firmware we want to the factory reset app region, and reboot.
I patched the firmware to fix the SPI flash bug and updated the Blink to the newest software version. After doing so, I dumped the flash again, separated the image into its component parts, checked that the exploits still existed in the newest version, and updated all my hard-coded addresses with the appropriate new ones. I had working arbitrary code execution with persistence and created a proof of concept that just made the Blink tap out SOS in Morse code on its main LED.
Bug Bounty
Having done all this work, I figured it would be nice to get paid for it. I found the Blink video doorbell listed as a target under Ring’s HackerOne page and submitted a report.
Timeline:
- June 8: I submit report
- June 9: Vulnerability triaged by HackerOne as Medium severity due to “constrained impact as it requires physical proximity during the specific initialization window.”
- June 9: I suggest a higher severity might be more accurate, as the Ring program description states that "Vulnerabilities that allow an attacker to perform remote or local bypass of critical security controls for example secure boot bypass fall into [Critical]." and “Vulnerabilities that allow an attacker to perform arbitrary code execution… are also classified as critical vulnerabilities.”
- June 11: Ring staff update severity to critical
- June 12: Ring staff mark report as triaged
- June 18: I ask for an update
- June 25: Ring staff: "Dropping it down to high due to attack complexity." This was the entire message.
- June 25: $7,000 bounty awarded
- June 25: I note that the vulnerability is a stack overflow due to user-supplied length and pretty simple abuse of intended functionality. I ask for more details as to what complexity warranted the severity drop.
- July 4: I repeat my request for more details
- July 10: I repeat my request for more details (The minimum payout for a 'critical' vulnerability is $20,000!)
- July 16, 4:10pm: I inform the Blink team that I will be publishing a writeup and POC on August 1st.
- July 16, 5:23pm: The Blink team demands that I not publish said writeup
- July 16: I inform them that I will be publishing it anyway.
- July 22: Firmware version 12.82 is released, patching the stack overflow vulnerability
Some Thoughts
As of July 31st, I have not heard another word as to why the vulnerability was downgraded. This is disappointing; by my estimation, $7,000 is probably no more than a tenth of the value of this exploit chain to an appropriately motivated attacker. $20,000 would have been quite nice, this was rather a lot of work and the exploit chain is fairly unambigously critical according to their definition.
Disclosing without permission is mildly risky, but I ran the exploit entirely on machines I own. I see no possible way to interpret anything I've done as a violation of the computer fraud and abuse act. It's hard to argue with the results; (one of) the bugs got patched in 6 days, after over a month of no progress. HackerOne lists the penalty for unauthorized disclosure as a 'Final Warning,' which is chill. I'm not planning on giving them any exploits I might find in the future anyways, given how I was treated this time. (HackerOne claims to have mediation to resolve these kinds of disputes. It has not been available for me in the past month).
Proof of concept for the vulnerability on version 12.81 is on my Github (though for copyright reasons, the patched SOS binary is not included). I'm calling the exploit 'orbital fracture' for no particular reason. Feel free to reach out with any questions.
Hacking stuff is fun
-Jackson